OpenClaw model provider setup ఏర్పాటు
installation తర్వాత ఏ model provider API key తోనైనా OpenClaw configure చేయండి.
Appbox లో OpenClaw model API key అవసరం లేకుండానే install అవుతుంది.
setup పూర్తి చేయడానికి సిఫార్సు చేసిన మార్గం SSH ద్వారా మీ OpenClaw app కు connect అయి built-in openclaw onboard wizard నడపడం. పూర్తి config ను చేతితో edit చేయడంకంటే wizard సురక్షితం, ఎందుకంటే model providers, API keys, channels, health checks, మరియు skills ద్వారా guide చేస్తూనే Appbox gateway settings ను preserve చేస్తుంది.
SSH ఉపయోగించలేకపోతే లేదా ఉపయోగించాలనుకోకపోతే, బదులుగా backup dashboard method ఉపయోగించండి.
సిఫార్సు చేసిన విధానం: OpenClaw లోకి SSH చేసి onboarding నడపండి
కొత్త installs కోసం, అలాగే model provider credentials జోడించాల్సిన లేదా మార్చాల్సిన existing installs కోసం ఈ method ఉపయోగించండి.
ముందుగా మీకు కావాల్సింది
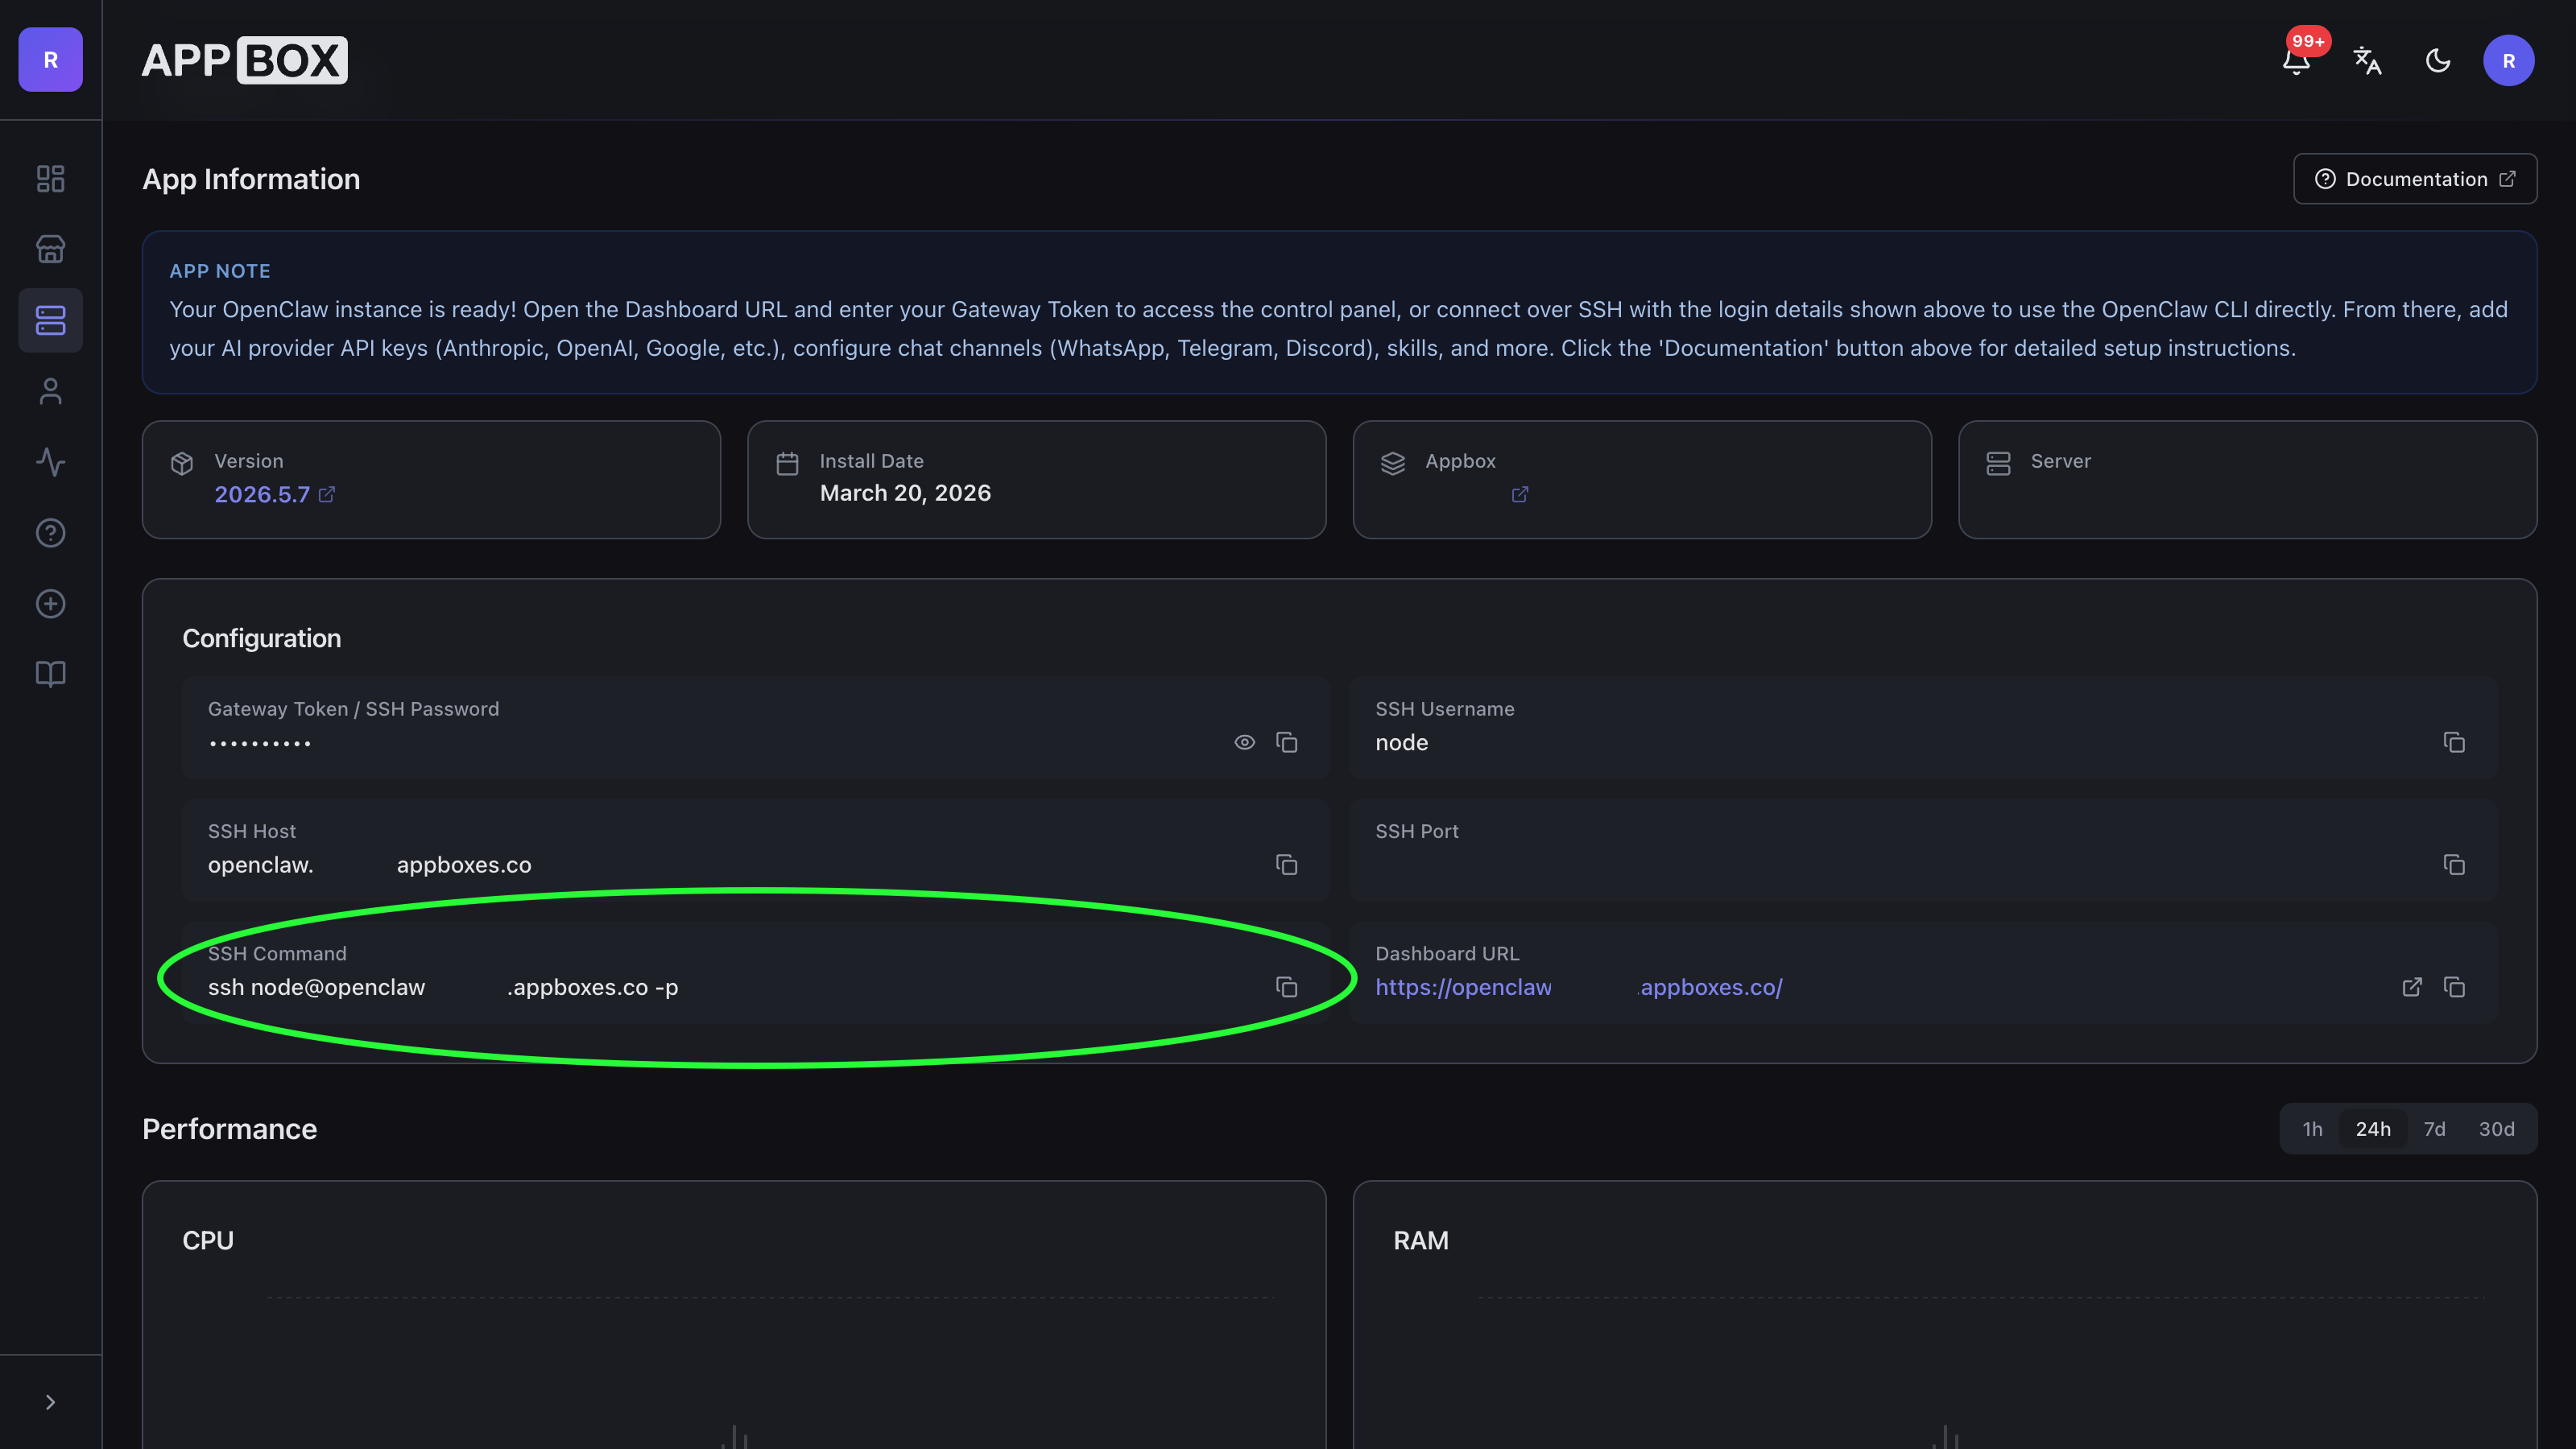
- Appbox లో మీ OpenClaw app details page.
- Configuration section లో చూపించే SSH Command.
- మీ Gateway Token / SSH Password. ఇదే OpenClaw dashboard login కోసం ఉపయోగించే generated secret.
- model provider account లేదా API key. ఇంకా లేకపోతే, Getting API keys చూడండి.
app details page ready-to-copy SSH command చూపిస్తుంది:
macOS నుండి connect అవ్వడం
- Terminal లేదా iTerm2 తెరవండి.
- OpenClaw app details page నుండి SSH Command copy చేయండి.
- paste చేసి run చేయండి. అది ఇలాంటిదిగా కనిపిస్తుంది:
ssh node@your-openclaw-domain.example -p 12345- host ను trust చేయాలా అని macOS అడిగితే,
yestype చేసి Enter నొక్కండి. - password అడిగినప్పుడు, మీ Gateway Token / SSH Password paste చేసి Enter నొక్కండి. మీరు password type చేసినా లేదా paste చేసినా Terminal ఏ characters చూపించదు.
Windows నుండి connect అవ్వడం
Windows 10 మరియు Windows 11 లో OpenSSH client default గా ఉంటుంది.
- Windows Terminal లేదా PowerShell తెరవండి.
- OpenClaw app details page నుండి SSH Command copy చేయండి.
- paste చేసి run చేయండి:
ssh node@your-openclaw-domain.example -p 12345- host ను trust చేయాలా అని Windows అడిగితే,
yestype చేసి Enter నొక్కండి. - password అడిగినప్పుడు, మీ Gateway Token / SSH Password paste చేసి Enter నొక్కండి. PowerShell pasted password చూపించదు.
Windows ssh గుర్తించలేదని చెబితే, Settings > System > Optional features నుండి OpenSSH Client install చేసి, Windows Terminal మళ్లీ తెరిచి మళ్లీ ప్రయత్నించండి.
OpenClaw onboarding wizard నడపడం
SSH connect అయిన తర్వాత, నడపండి:
openclaw onboard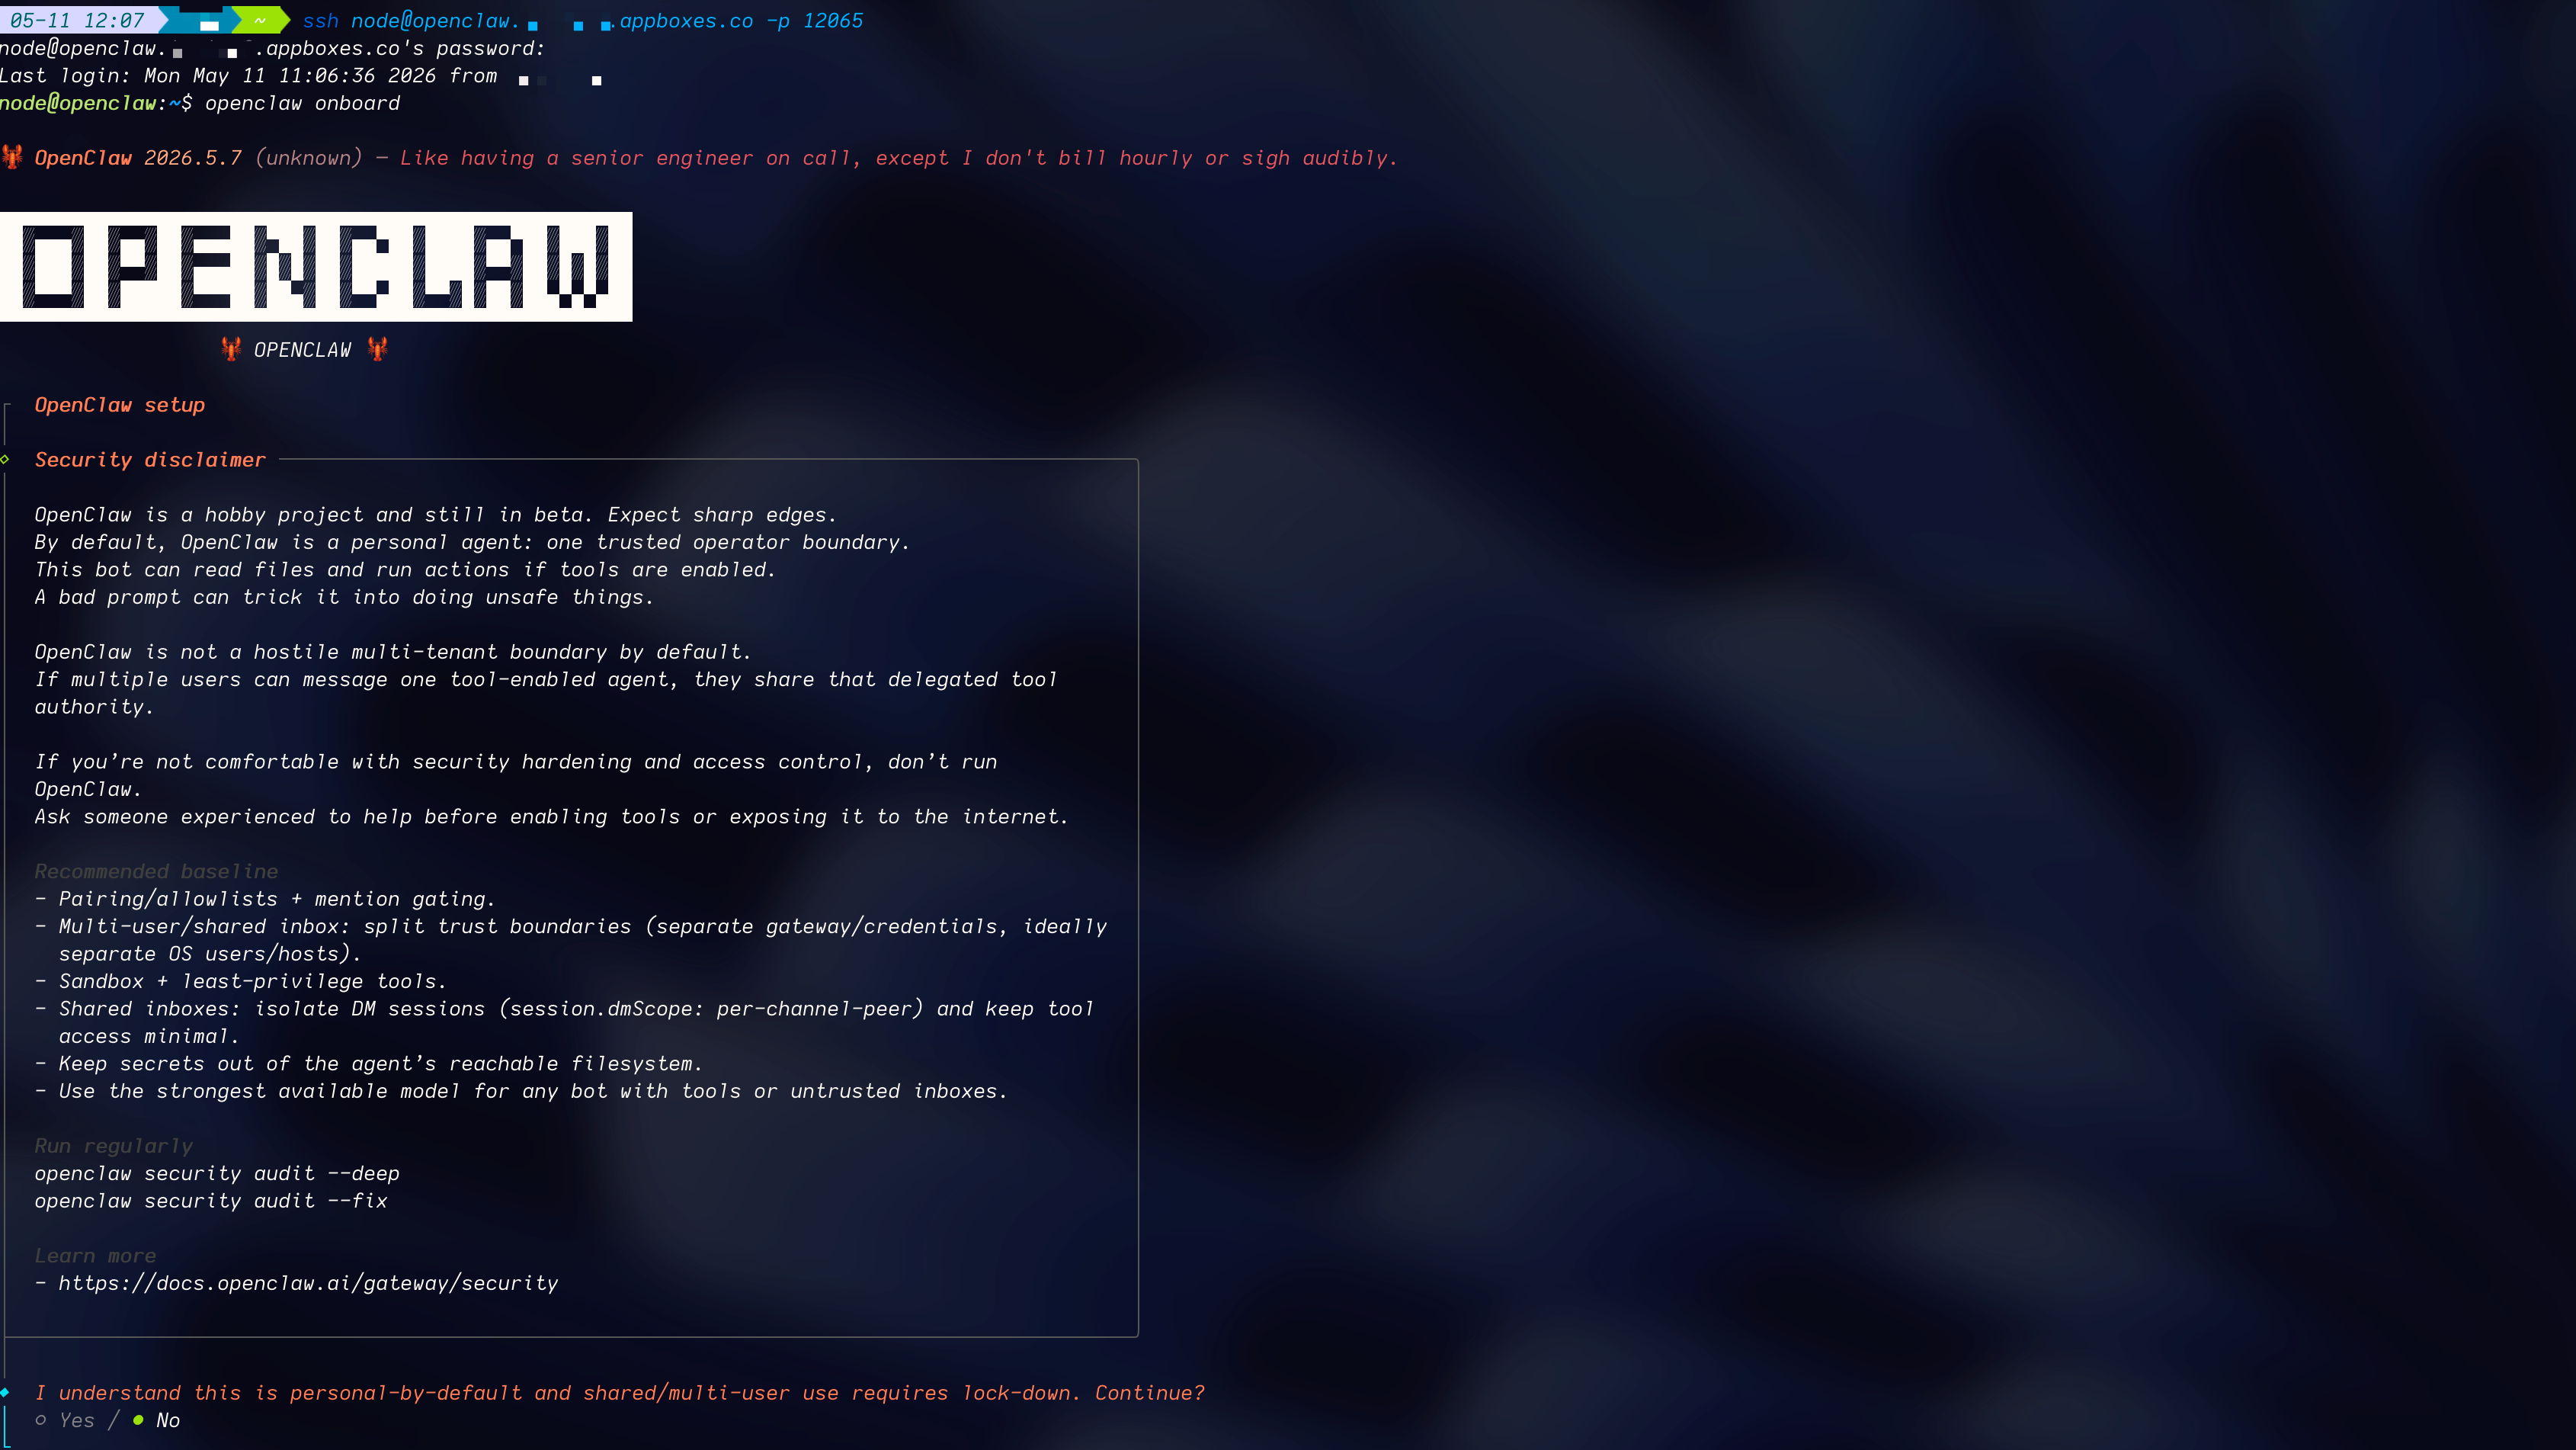
wizard interactive. ఈ Appbox-specific choices ఉపయోగించండి:
- Existing config: current config review లేదా modify చేసే option ఎంచుకోండి. మీ OpenClaw setup ను మొదటి నుండి rebuild చేయాలనే ఉద్దేశం లేకపోతే full reset ఎంచుకోవద్దు.
- Model and auth: OpenRouter, OpenAI, Anthropic, Google, xAI, లేదా custom OpenAI-compatible provider వంటి మీ provider ఎంచుకోండి. wizard అడిగినప్పుడు API key paste చేయండి. ఒక key అనేక models కు route చేయగలదు కాబట్టి చాలా మంది users కు OpenRouter సులభమైన default. మీకు OpenAI Codex subscription ఉంటే, provider list లో OpenAI Codex ఎంచుకోండి, కేవలం
codexఅనే option కాదు. - Default model: ఆ provider కోసం wizard recommend చేసే model ఎంచుకోండి, లేదా
openrouter/autoవంటిprovider/modelvalue manual గా enter చేయండి. - Workspace: మార్చడానికి నిర్దిష్ట కారణం లేకపోతే default workspace ఉంచండి.
- Gateway settings: existing Appbox gateway settings ఉంచండి. ముఖ్యంగా token auth enabled గా ఉంచండి మరియు existing gateway port/bind settings ఉంచండి.
- Channels: WhatsApp, Telegram, Discord, Signal, iMessage, లేదా ఇతర channels ఇప్పుడు configure చేయండి, లేదా skip చేసి తర్వాత
openclaw configureతో add చేయండి. - Web search: మీ వద్ద search provider ఉంటే ఎంచుకోండి, లేకపోతే ఇప్పటికి skip చేయండి.
- Daemon/service install: Appbox container లో OpenClaw ను ఇప్పటికే supervise చేస్తుంది, కాబట్టి wizard offer చేస్తే daemon installation skip చేయండి.
- Health check: wizard health check run చేయనివ్వండి.
- Skills: bundled skills check చేయడానికి wizard ను allow చేయండి. Preferred node manager for skill installs అడిగితే,
npmఎంచుకోండి.
onboarding పూర్తయిన తర్వాత, మీ OpenClaw dashboard కు తిరిగి వెళ్లండి. dashboard ఇప్పటికే open ఉంటే, refresh చేసి చిన్న chat prompt test చేయండి.
SSH ద్వారా ఉపయోగకరమైన follow-up commands:
openclaw configure
openclaw status --deep
openclaw healthAPI keys పొందడం (dashboard links తో)
keys generate చేయడానికి ఈ provider consoles ఉపయోగించండి. recommended SSH method తో, openclaw onboard అడిగినప్పుడు key paste చేయండి. backup dashboard method తో, key ను Config > Secrets > Raw లో merge చేయండి.
మొదట సిఫార్సు: OpenRouter (చాలా మంది users కు best default)
మేము ఎందుకు సిఫార్సు చేస్తున్నాము:
- ఇది అనేక model vendors కోసం ఒక key ఇస్తుంది.
- మీరు
openrouter/autoఉపయోగించవచ్చు; ఇది task difficulty ఆధారంగా models switch చేయగలదు. autosimpler tasks ను cheaper models కు route చేసి cost తగ్గించగలదు.
key పొందడం ఎలా:
- OpenRouter కు వెళ్లి sign in చేయండి.
- API Keys settings తెరవండి.
- Create క్లిక్ చేసి key copy చేయండి (ఒకసారి మాత్రమే చూపిస్తుంది).
- OpenClaw wizard మీ OpenRouter API key అడిగినప్పుడు దీన్ని ఉపయోగించండి. backup dashboard method కోసం, config key
models.providers.openrouter.apiKey.

Source tutorial: How to Get an OpenRouter API Key
OpenAI
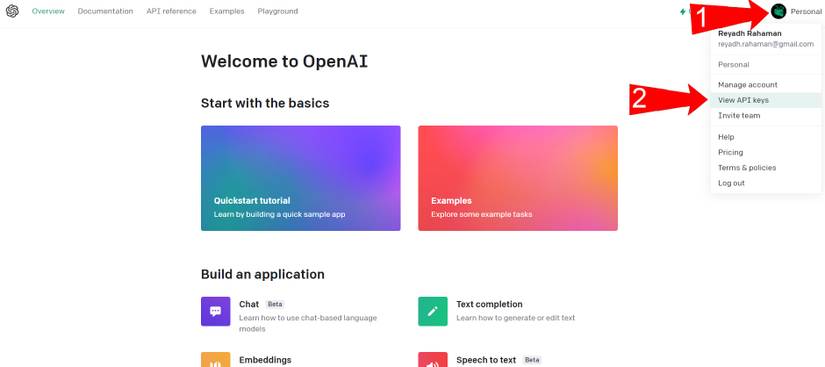
key పొందడం ఎలా:
- OpenAI Platform లో sign in చేయండి.
- API Keys తెరవండి.
- Create new secret key క్లిక్ చేయండి.
- వెంటనే copy చేయండి (OpenAI పూర్తి value ఒక్కసారి మాత్రమే చూపిస్తుంది).
Source tutorial: How to Get an OpenAI API Key
Anthropic
key పొందడం ఎలా:
- Anthropic Console లో sign in చేయండి.
- API Keys తెరవండి.
- Create Key క్లిక్ చేయండి.
- key ను వెంటనే copy చేయండి (ఒకసారి మాత్రమే చూపిస్తుంది).

Source tutorial: How to get your Claude API key
Google (Gemini via AI Studio)
key పొందడం ఎలా:
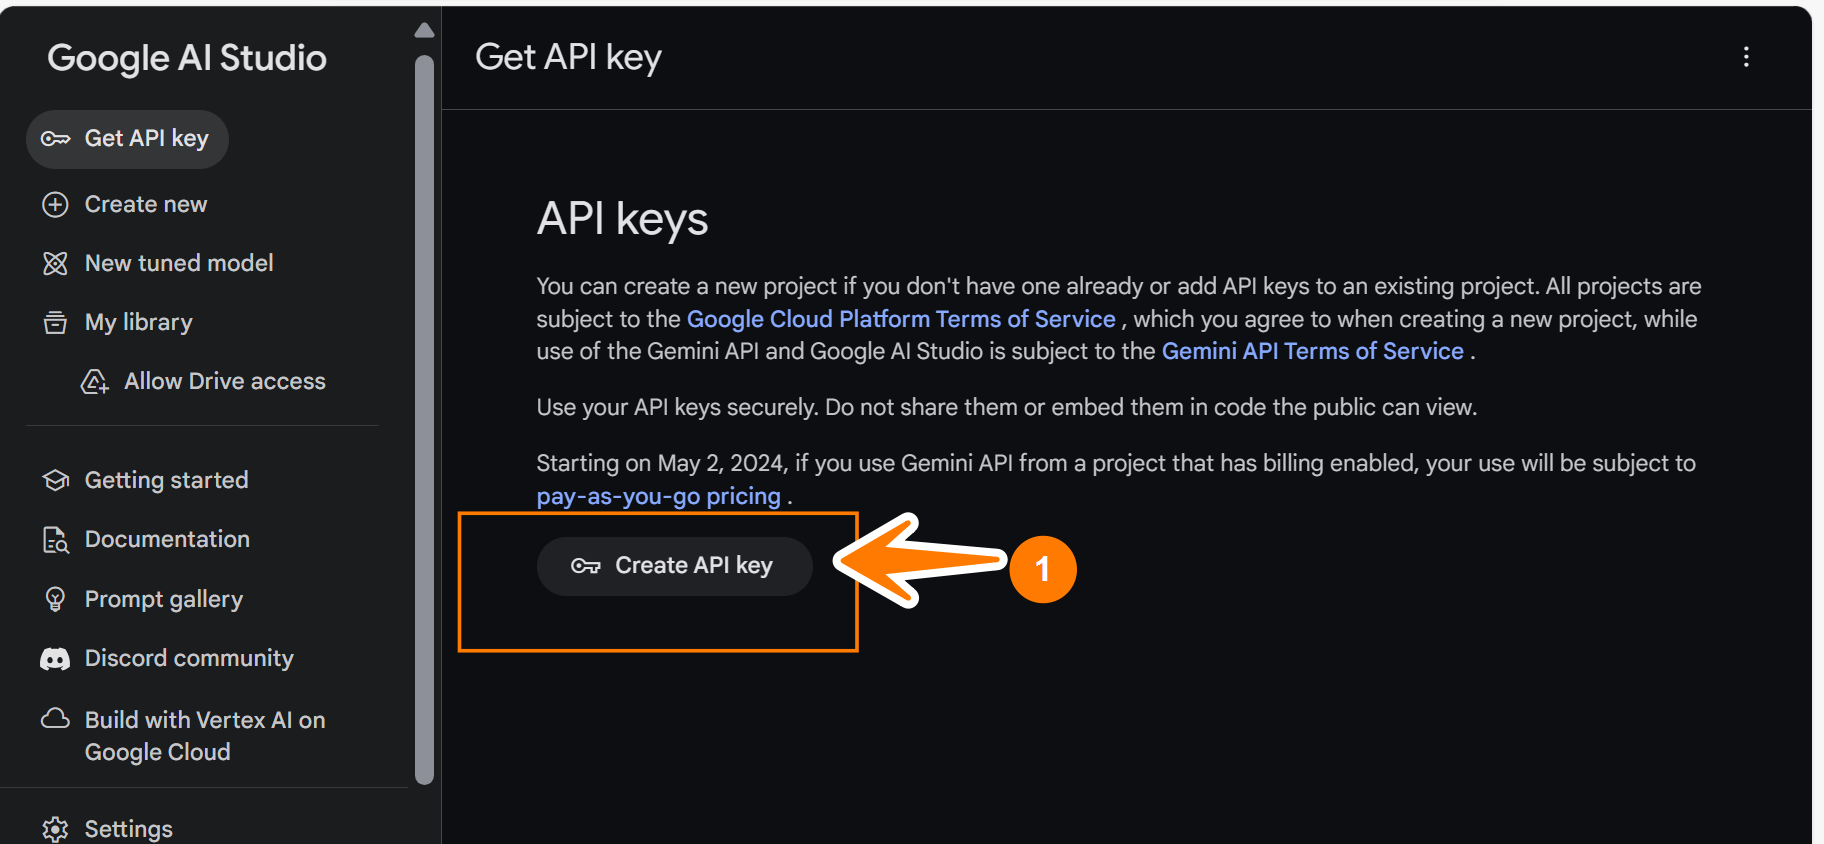
- Google AI Studio తెరవండి.
- API Keys కు వెళ్లండి.
- Create API key క్లిక్ చేయండి (new లేదా existing project).
- key copy చేసి save చేయండి.
Source tutorial: Get Google AI API Key
Note: provider dashboards తరచుగా మారవచ్చు మరియు మీ session state ఆధారంగా login prompt చూపవచ్చు.
Backup method: dashboard లో provider auth configure చేయడం
SSH అందుబాటులో లేకపోతే లేదా manual configuration ఇష్టమైతే మాత్రమే ఈ method ఉపయోగించండి. dashboard Raw editor పనిచేస్తుంది, కానీ మొత్తం OpenClaw config object ను ఒకేసారి edit చేస్తుంది. Appbox gateway మరియు skills defaults ను replace చేయకుండా existing file లోకి provider settings merge చేయడంలో జాగ్రత్తగా ఉండండి.
- installed app details page నుండి మీ OpenClaw dashboard URL తెరవండి.
- Config > Secrets కు వెళ్లండి.
- Form బదులుగా Raw ఎంచుకోండి.
- Reveal sensitive values button క్లిక్ చేయండి (strike-through ఉన్న eye లా కనిపిస్తుంది).
- క్రింద ఉన్న examples నుండి provider settings ను మీ existing config లోకి Merge చేయండి (How manual provider config fits in the full file చూడండి) — gateway, skills, మరియు ఇతర Appbox defaults reset చేయాలనే ఉద్దేశం లేకపోతే మొత్తం file replace చేయవద్దు.
- configuration changes save చేసి apply చేయండి.
full file లో manual provider config ఎలా సరిపోతుంది
Config > Secrets > Raw ఒక object లో మొత్తం OpenClaw config ను edit చేస్తుంది. Appbox లో, ఆ file ఇప్పటికే gateway (bind, token auth, Control UI), skills.load.extraDirs (bundled skills), commands, మరియు కొన్నిసార్లు meta వంటి విషయాలను కలిగి ఉంటుంది. Major provider examples section లోని snippets models కోసం మీకు అవసరమైన భాగాలను మాత్రమే చూపిస్తాయి: models tree మరియు agents.defaults.model.primary.
చేయాల్సింది: మీ existing top-level keys (gateway, skills, commands, etc.) ఉంచి ఈ రెండు sections ను add లేదా update చేయండి:
models.providers— మీ provider (ఉదా.openrouter) మరియు దానిapiKey, అవసరమైన చోటbaseUrl, మరియుmodelslist జోడించండి.agents.defaults.model.primary— agent ఆ provider ఉపయోగించేందుకు default model string (ఉదా.openrouter/auto) set చేయండి.
models లేదా agents ఇప్పటికే ఉంటే, duplicate చేయకుండా కొత్త keys ను ఆ objects లోకి merge చేయండి.
క్రింద ఒక full Raw file shape కు JSON example ఉంది (editor practical గా JSON5-style quotes కూడా accept చేయవచ్చు). మీ real file లో మరిన్ని fields ఉండవచ్చు (ఉదా. richer model metadata, meta). క్రింద ఉన్న examples లోని provider blocks ను మీరు ఇక్కడ models మరియు agents తో align చేయాలి.
{
  "models": {
    "providers": {
      "openrouter": {
        "baseUrl": "https://openrouter.ai/api/v1",
        "apiKey": "YOUR_OPENROUTER_KEY",
        "models": [
          {
            "id": "auto",
            "name": "Auto (OpenRouter)",
            "reasoning": false,
            "input": ["text"],
            "cost": {
              "input": 0,
              "output": 0,
              "cacheRead": 0,
              "cacheWrite": 0
            },
            "contextWindow": 200000,
            "maxTokens": 8192
          }
        ]
      }
    }
  },
  "agents": {
    "defaults": {
      "model": {
        "primary": "openrouter/auto"
      }
    }
  },
  "commands": {
    "native": "auto",
    "nativeSkills": "auto",
    "restart": true,
    "ownerDisplay": "raw"
  },
  "gateway": {
    "bind": "lan",
    "controlUi": {
      "dangerouslyAllowHostHeaderOriginFallback": true,
      "dangerouslyDisableDeviceAuth": true
    },
    "auth": {
      "mode": "token",
      "token": "YOUR_GATEWAY_TOKEN"
    }
  },
  "skills": {
    "load": {
      "extraDirs": ["/app/skills"]
    }
  }
}Gateway token vs provider API key:
gateway.auth.tokenOpenClaw Control UI / gateway లోకి login చేయడానికి మాత్రమే.models.providers.*.apiKeyమీ LLM vendor key (OpenRouter, OpenAI, etc.) — ఇవి వేర్వేరు.
ప్రధాన provider examples
మొదట ఒక్క provider block మాత్రమే ఉపయోగించి, అది పనిచేస్తుందో confirm చేసి, తర్వాత మరిన్ని providers జోడించండి. క్రింద ప్రతి example ఒక merge fragment: ... omitted config (పై లేదా కింది lines), మరియు "models" కు ముందు ఉన్న }, మీ file లో models పైన ఉన్న key (ఉదా. skills లేదా commands) close. snippets ఒక్కటే valid JSON కాదు — models మరియు agents sections ను మీ root object లోకి merge చేయండి.
OpenRouter
...
  },
  "models": {
    "providers": {
      "openrouter": {
        "baseUrl": "https://openrouter.ai/api/v1",
        "apiKey": "sk-or-...",
        "models": [
          {
            "id": "auto",
            "name": "Auto (OpenRouter)"
          }
        ]
      }
    }
  },
  "agents": {
    "defaults": {
      "model": {
        "primary": "openrouter/auto"
      }
    }
  },
...OpenAI
...
  },
  "models": {
    "providers": {
      "openai": {
        "baseUrl": "https://api.openai.com/v1",
        "apiKey": "sk-...",
        "models": [
          {
            "id": "gpt-5.4",
            "name": "GPT-5.4"
          }
        ]
      }
    }
  },
  "agents": {
    "defaults": {
      "model": {
        "primary": "openai/gpt-5.4"
      }
    }
  },
...Anthropic
...
  },
  "models": {
    "providers": {
      "anthropic": {
        "baseUrl": "https://api.anthropic.com/v1",
        "apiKey": "sk-ant-...",
        "models": [
          {
            "id": "claude-opus-4-6",
            "name": "Claude Opus 4.6"
          }
        ]
      }
    }
  },
  "agents": {
    "defaults": {
      "model": {
        "primary": "anthropic/claude-opus-4-6"
      }
    }
  },
...Google (Gemini)
...
  },
  "models": {
    "providers": {
      "google": {
        "apiKey": "AIza...",
        "models": [
          {
            "id": "gemini-3.1-pro-preview",
            "name": "Gemini 3.1 Pro Preview"
          }
        ]
      }
    }
  },
  "agents": {
    "defaults": {
      "model": {
        "primary": "google/gemini-3.1-pro-preview"
      }
    }
  },
...xAI (Grok)
...
  },
  "models": {
    "providers": {
      "xai": {
        "apiKey": "xai-...",
        "models": [
          {
            "id": "grok-4",
            "name": "Grok 4"
          }
        ]
      }
    }
  },
  "agents": {
    "defaults": {
      "model": {
        "primary": "xai/grok-4"
      }
    }
  },
...Mistral
...
  },
  "models": {
    "providers": {
      "mistral": {
        "baseUrl": "https://api.mistral.ai/v1",
        "apiKey": "sk-...",
        "models": [
          {
            "id": "mistral-large-latest",
            "name": "Mistral Large Latest"
          }
        ]
      }
    }
  },
  "agents": {
    "defaults": {
      "model": {
        "primary": "mistral/mistral-large-latest"
      }
    }
  },
...Together AI
...
  },
  "models": {
    "providers": {
      "together": {
        "baseUrl": "https://api.together.xyz/v1",
        "apiKey": "together-...",
        "models": [
          {
            "id": "moonshotai/Kimi-K2.5",
            "name": "Kimi K2.5"
          }
        ]
      }
    }
  },
  "agents": {
    "defaults": {
      "model": {
        "primary": "together/moonshotai/Kimi-K2.5"
      }
    }
  },
...Bedrock note (API key లేదు)
Amazon Bedrock API key బదులుగా AWS credentials (ఉదాహరణకు AWS_ACCESS_KEY_ID, AWS_SECRET_ACCESS_KEY, AWS_REGION) ఉపయోగిస్తుంది. minimal provider entry ఇలా ఉంటుంది:
...
  },
  "models": {
    "providers": {
      "amazon-bedrock": {
        "baseUrl": "https://bedrock-runtime.us-east-1.amazonaws.com",
        "api": "bedrock-converse-stream",
        "auth": "aws-sdk",
        "models": [
          {
            "id": "us.anthropic.claude-opus-4-6-v1:0",
            "name": "Claude Opus 4.6 (Bedrock)"
          }
        ]
      }
    }
  },
  "agents": {
    "defaults": {
      "model": {
        "primary": "amazon-bedrock/us.anthropic.claude-opus-4-6-v1:0"
      }
    }
  },
...గమనికలు
- Gateway auth token మరియు model provider API keys వేర్వేరు settings.
- provider error వస్తే (ఉదాహరణకు missing Anthropic key), మీ configured provider కు default model update చేయండి.
- provider validation fail అయితే, ముందుగా required provider fields present ఉన్నాయో చూసుకోండి (
baseUrl,models, మరియు వర్తించే చోటapiKey).