OpenClaw model provider setup
Configure OpenClaw with any model provider API key after installation.
OpenClaw is installed without requiring a model API key in Appbox.
The recommended way to finish setup is to connect to your OpenClaw app over SSH and run the built-in openclaw onboard wizard. The wizard is safer than editing the full config by hand because it preserves the Appbox gateway settings while guiding you through model providers, API keys, channels, health checks, and skills.
If you cannot or do not want to use SSH, use the backup dashboard method instead.
Recommended method: SSH into OpenClaw and run onboarding
Use this method for new installs and for existing installs that need model provider credentials added or changed.
What you need first
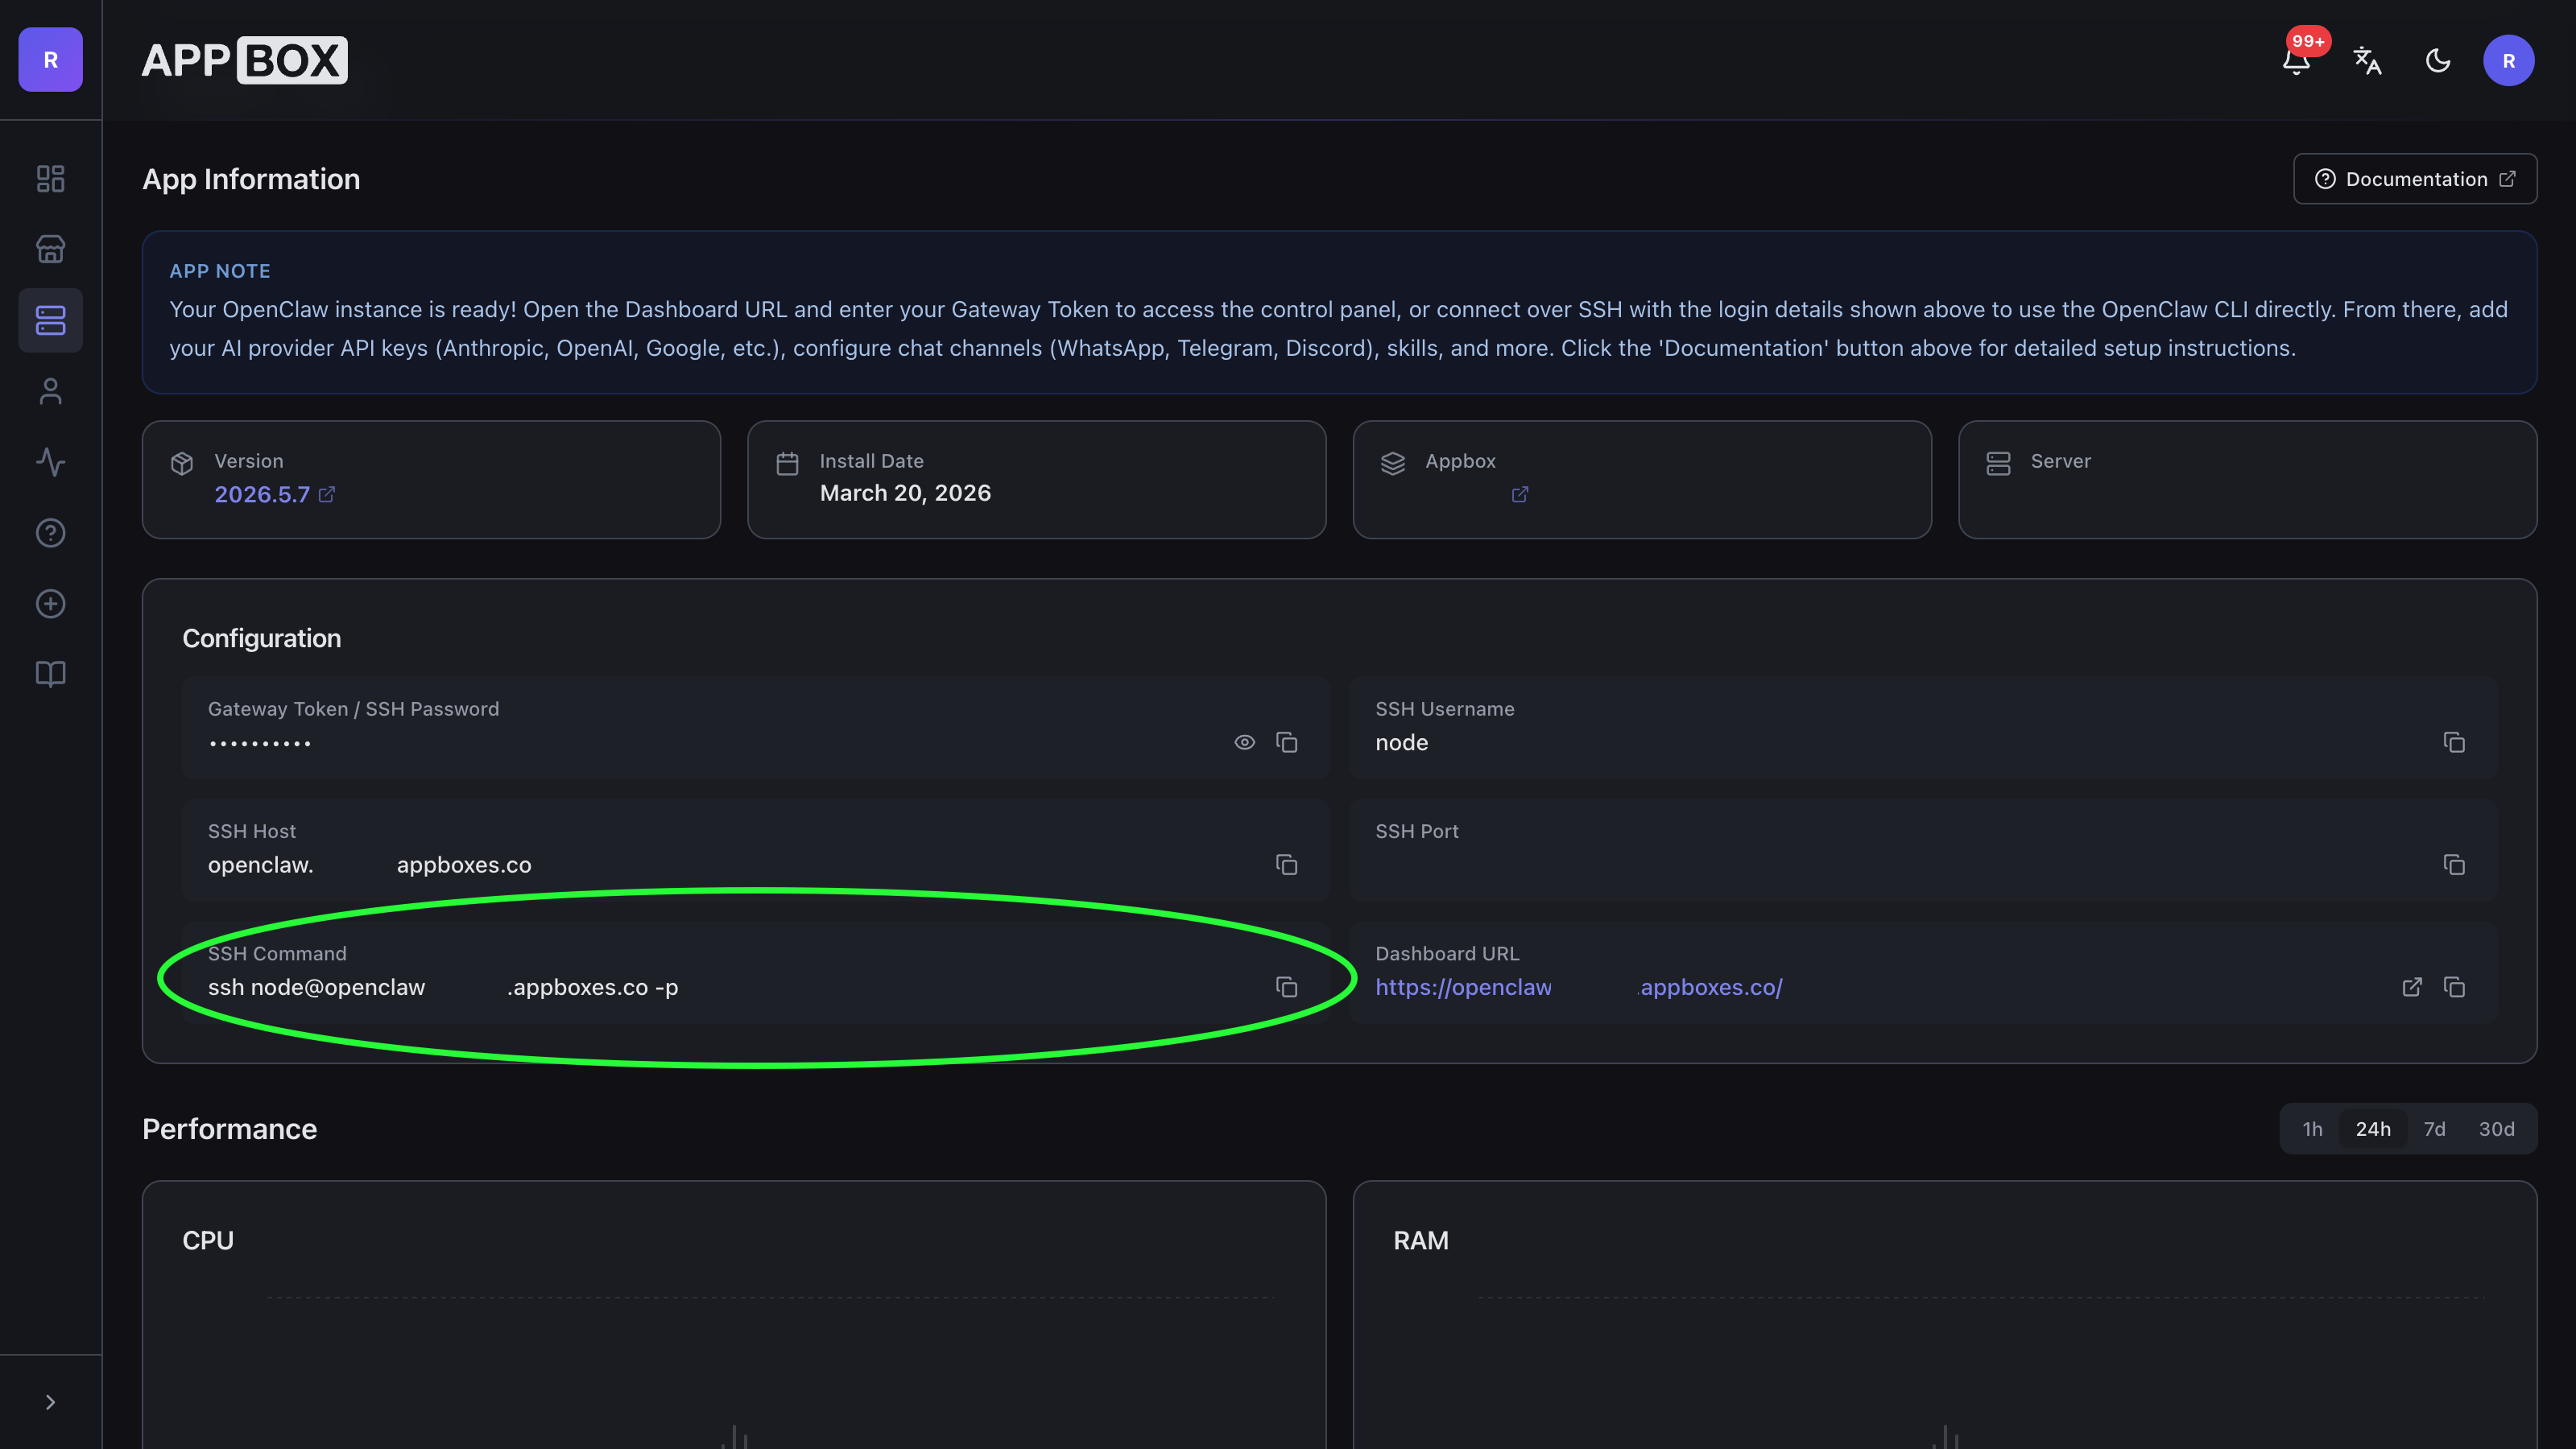
- Your OpenClaw app details page in Appbox.
- The SSH Command shown in the Configuration section.
- Your Gateway Token / SSH Password. This is the same generated secret used for the OpenClaw dashboard login.
- A model provider account or API key. If you do not have one yet, see Getting API keys.
The app details page shows the ready-to-copy SSH command:
Connect from macOS
- Open Terminal or iTerm2.
- Copy the SSH Command from the OpenClaw app details page.
- Paste and run it. It will look similar to this:
ssh node@your-openclaw-domain.example -p 12345- If macOS asks whether to trust the host, type
yesand press Enter. - When prompted for a password, paste your Gateway Token / SSH Password and press Enter. Terminal will not show any characters while you type or paste the password.
Connect from Windows
Windows 10 and Windows 11 include the OpenSSH client by default.
- Open Windows Terminal or PowerShell.
- Copy the SSH Command from the OpenClaw app details page.
- Paste and run it:
ssh node@your-openclaw-domain.example -p 12345- If Windows asks whether to trust the host, type
yesand press Enter. - When prompted for a password, paste your Gateway Token / SSH Password and press Enter. PowerShell will not show the pasted password.
If Windows says ssh is not recognized, install OpenSSH Client from Settings > System > Optional features, then reopen Windows Terminal and try again.
Run the OpenClaw onboarding wizard
After SSH connects, run:
openclaw onboard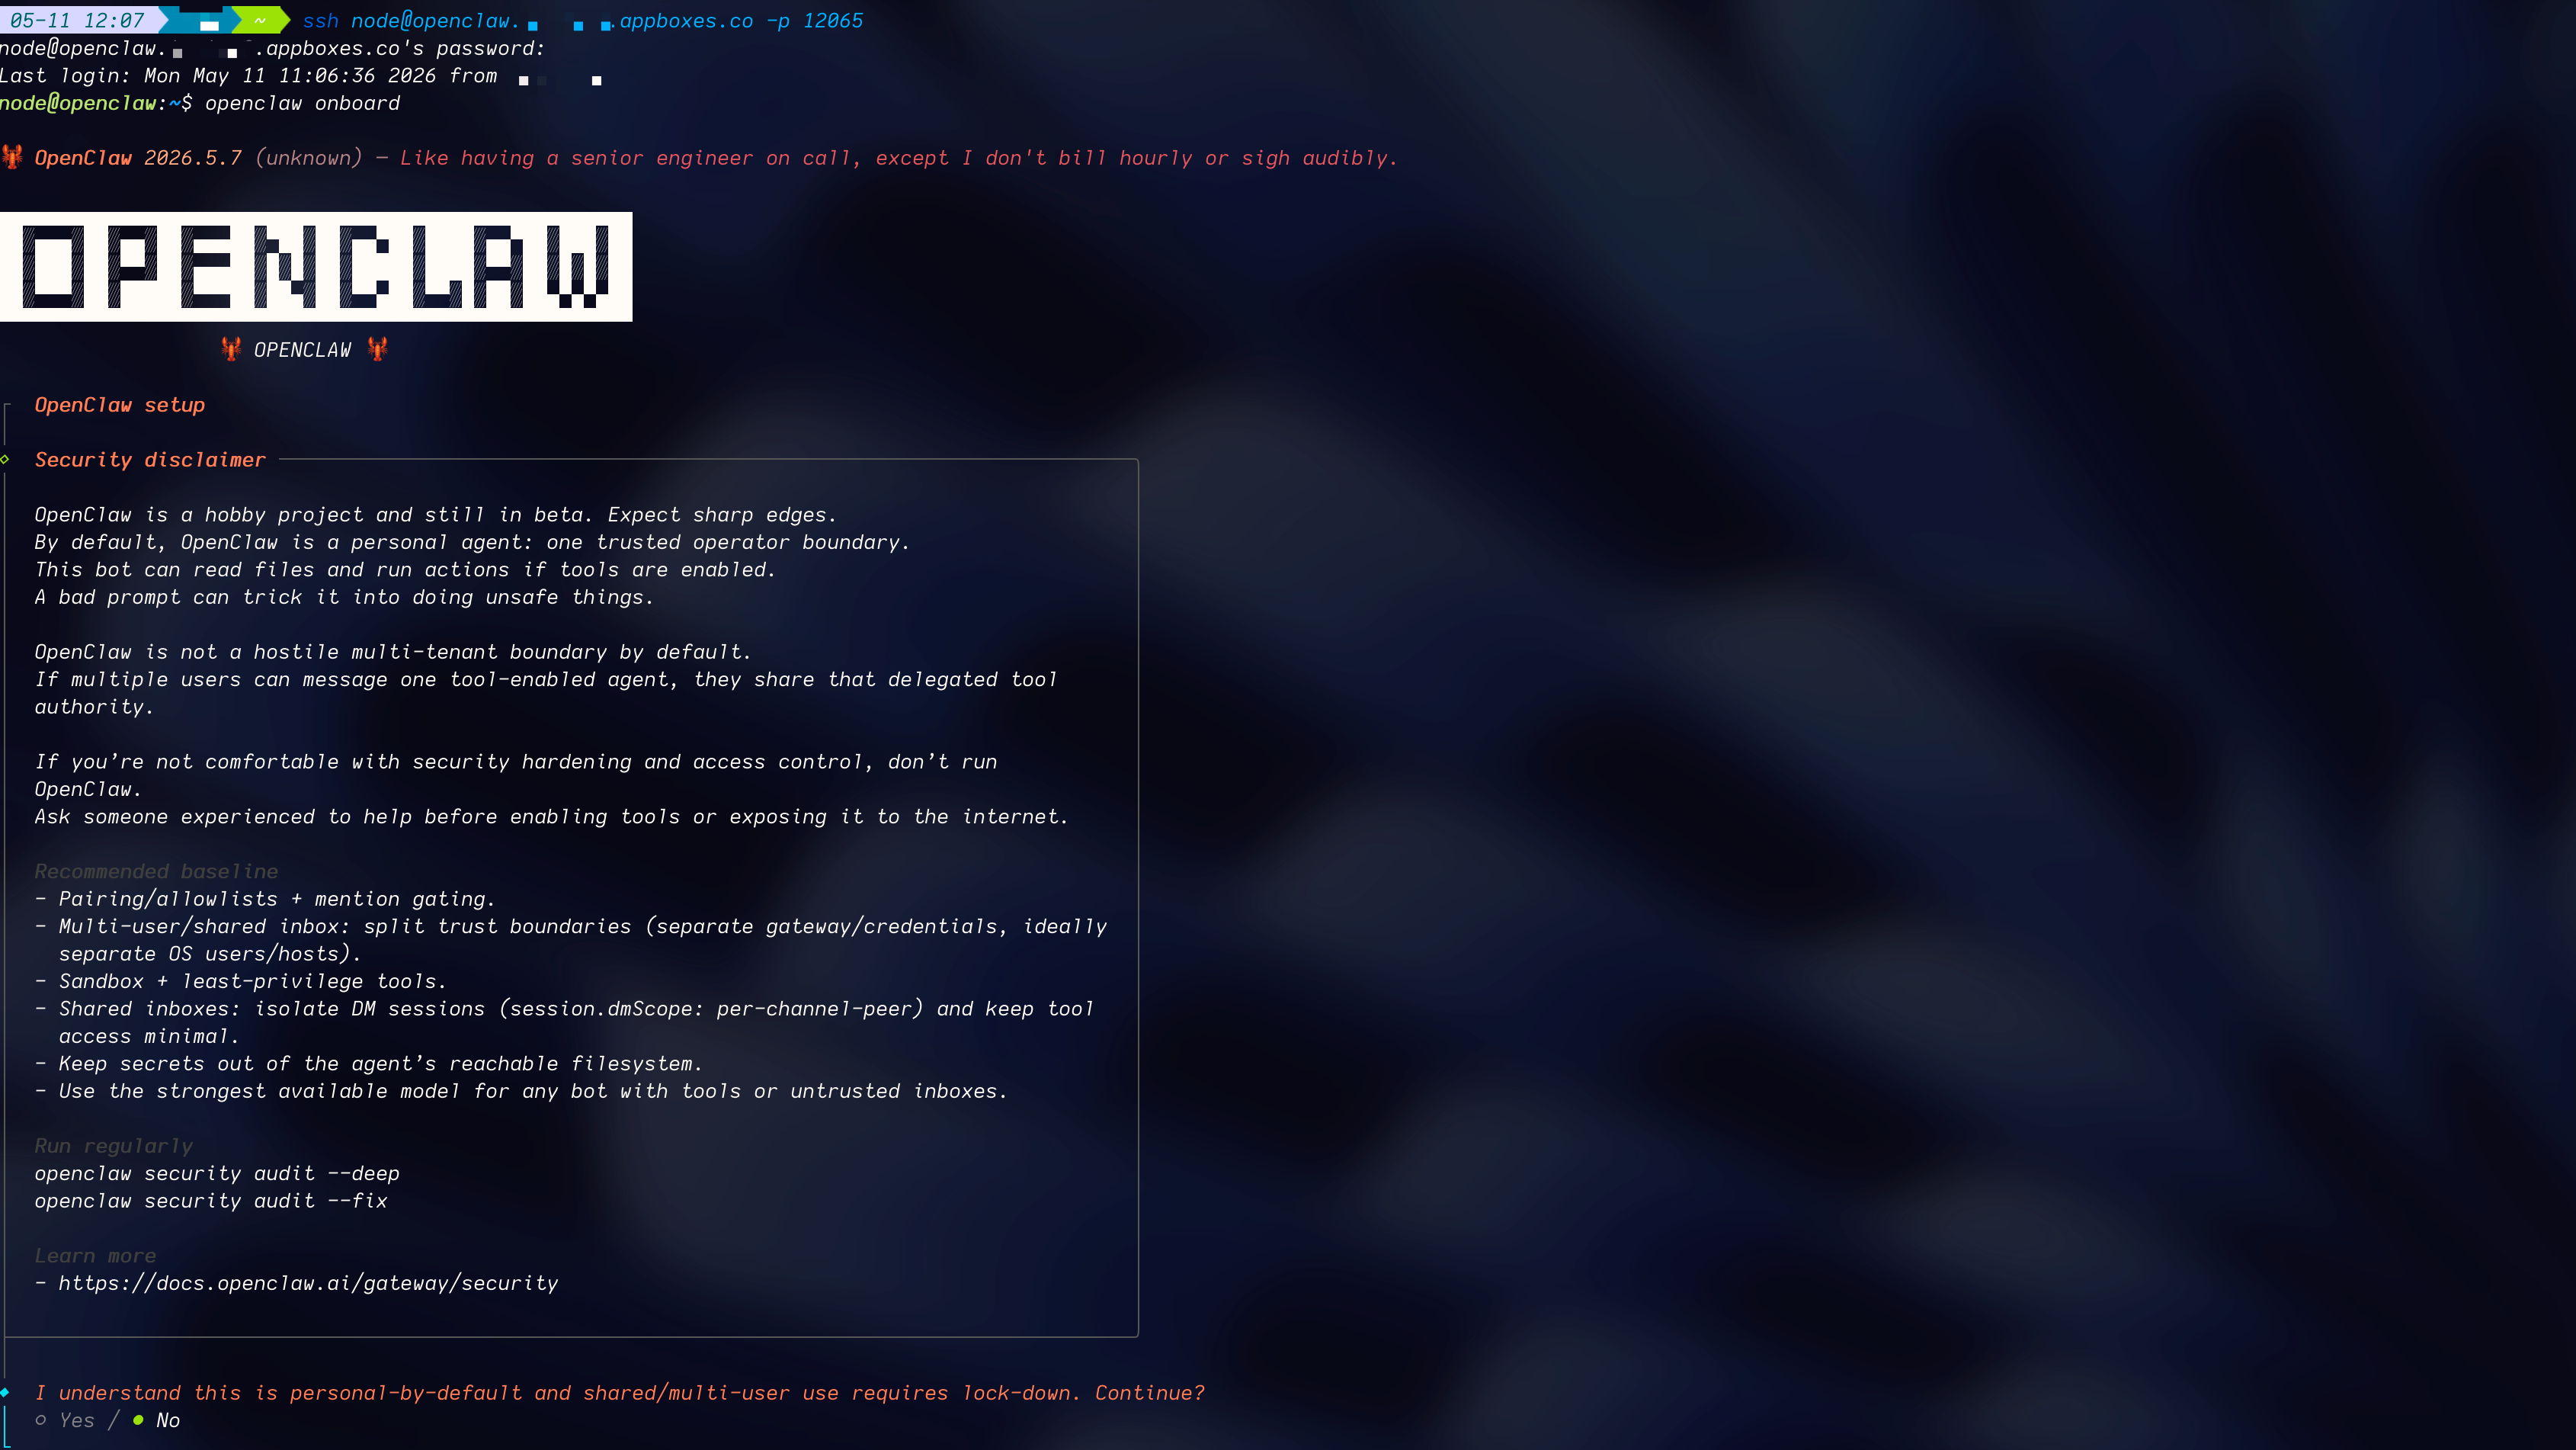
The wizard is interactive. Use these Appbox-specific choices:
- Existing config: choose the option to review or modify the current config. Do not choose a full reset unless you intentionally want to rebuild your OpenClaw setup from scratch.
- Model and auth: choose your provider, such as OpenRouter, OpenAI, Anthropic, Google, xAI, or a custom OpenAI-compatible provider. Paste the API key when the wizard asks. OpenRouter is the easiest default for most users because one key can route to many models. If you have an OpenAI Codex subscription, choose OpenAI Codex in the provider list, not an option named only
codex. - Default model: pick the model the wizard recommends for that provider, or enter a
provider/modelvalue manually, such asopenrouter/auto. - Workspace: keep the default workspace unless you have a specific reason to change it.
- Gateway settings: keep the existing Appbox gateway settings. In particular, keep token auth enabled and keep the existing gateway port/bind settings.
- Channels: configure WhatsApp, Telegram, Discord, Signal, iMessage, or other channels now, or skip them and add them later with
openclaw configure. - Web search: choose a search provider if you have one, or skip it for now.
- Daemon/service install: Appbox already supervises OpenClaw inside the container, so skip daemon installation if the wizard offers it.
- Health check: let the wizard run the health check.
- Skills: allow the wizard to check bundled skills. When it asks Preferred node manager for skill installs, choose
npm.
When onboarding finishes, return to your OpenClaw dashboard. If the dashboard was already open, refresh it and test a short chat prompt.
Useful follow-up commands over SSH:
openclaw configure
openclaw status --deep
openclaw healthGetting API keys (with dashboard links)
Use these provider consoles to generate keys. With the recommended SSH method, paste the key when openclaw onboard asks for it. With the backup dashboard method, merge the key into Config > Secrets > Raw.
Recommended first: OpenRouter (best default for most users)
Why we recommend it:
- It gives one key for many model vendors.
- You can use
openrouter/auto, which can switch models based on task difficulty. autocan reduce cost by routing simpler tasks to cheaper models.
How to get a key:
- Go to OpenRouter and sign in.
- Open API Keys settings.
- Click Create and copy the key (shown once).
- Use it when the OpenClaw wizard asks for your OpenRouter API key. For the backup dashboard method, the config key is
models.providers.openrouter.apiKey.

Source tutorial: How to Get an OpenRouter API Key
OpenAI
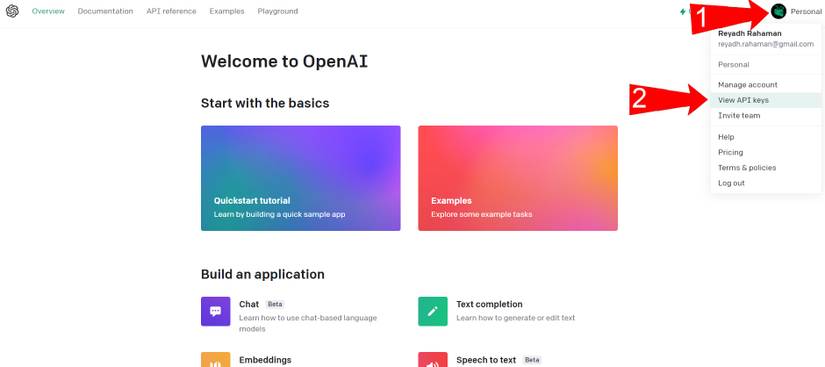
How to get a key:
- Sign in to OpenAI Platform.
- Open API Keys.
- Click Create new secret key.
- Copy it immediately (OpenAI only shows the full value once).
Source tutorial: How to Get an OpenAI API Key
Anthropic
How to get a key:
- Sign in to Anthropic Console.
- Open API Keys.
- Click Create Key.
- Copy the key immediately (shown once).

Source tutorial: How to get your Claude API key
Google (Gemini via AI Studio)
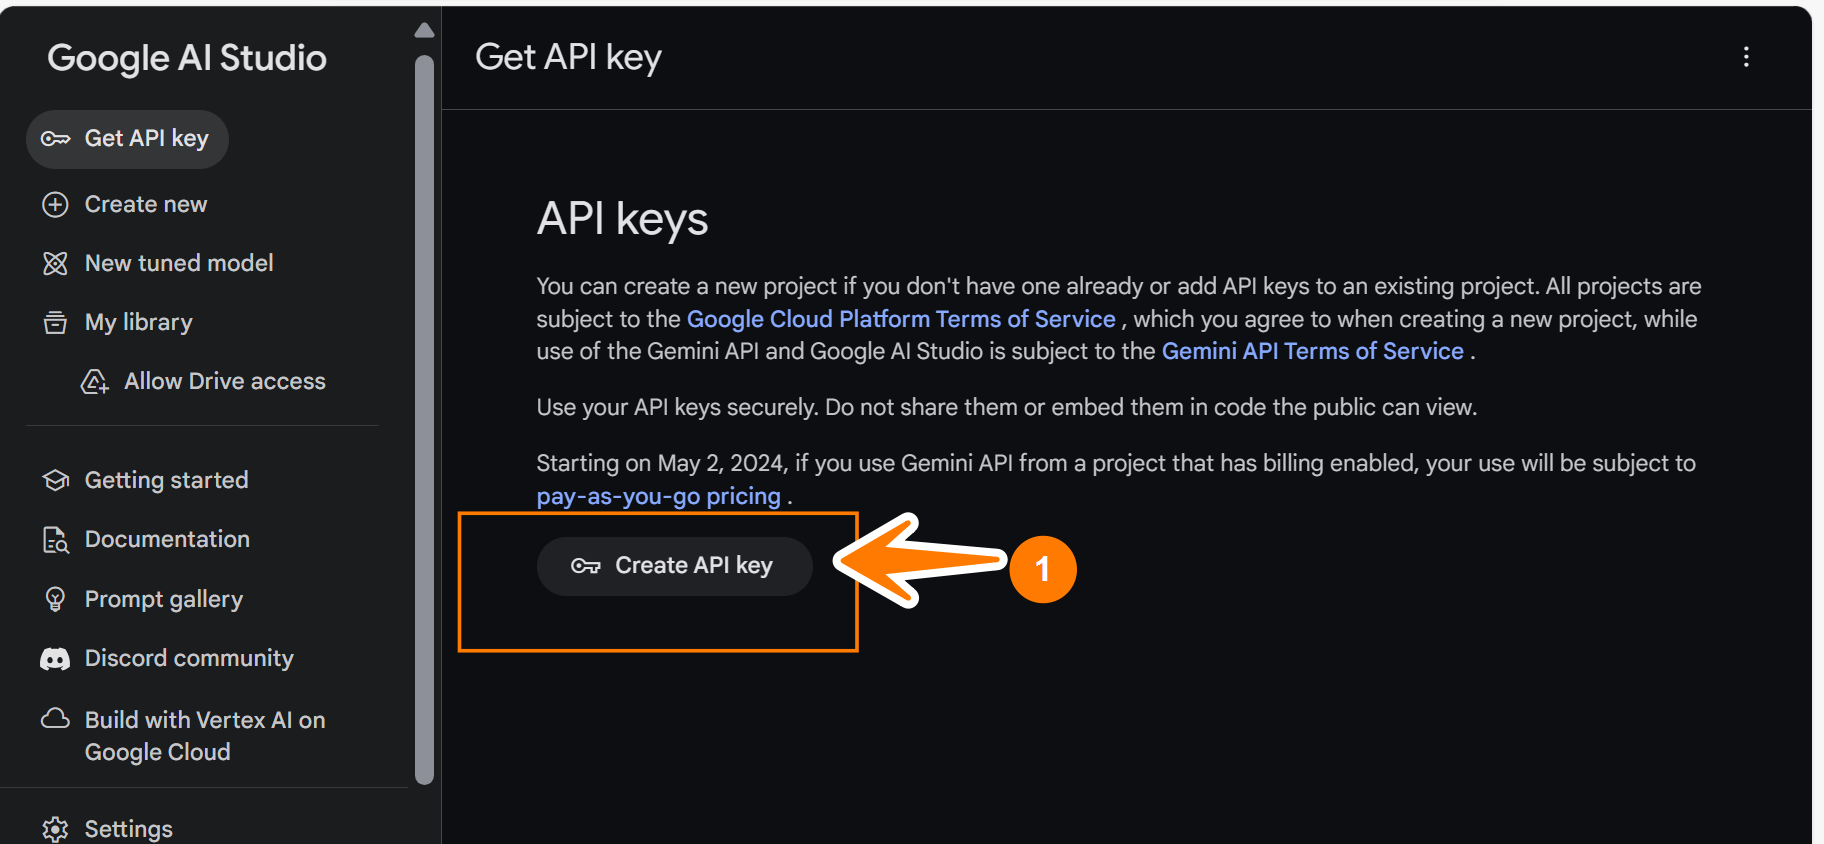
How to get a key:
- Open Google AI Studio.
- Go to API Keys.
- Click Create API key (new or existing project).
- Copy and save the key.
Source tutorial: Get Google AI API Key
Note: provider dashboards can change frequently and may show a login prompt depending on your session state.
Backup method: configure provider auth in the dashboard
Use this method only if SSH is unavailable or you prefer manual configuration. The dashboard Raw editor works, but it edits the entire OpenClaw config object at once. Be careful to merge provider settings into the existing file instead of replacing Appbox's gateway and skills defaults.
- Open your OpenClaw dashboard URL from the installed app details page.
- Go to Config > Secrets.
- Select Raw rather than Form.
- Click the Reveal sensitive values button (which looks like an eye with a strike through).
- Merge the provider settings from the examples below into your existing config (see How manual provider config fits in the full file) — do not replace the whole file unless you intend to reset gateway, skills, and other Appbox defaults.
- Save and apply configuration changes.
How manual provider config fits in the full file
Config > Secrets > Raw edits the entire OpenClaw config in one object. On Appbox, that file already includes things like gateway (bind, token auth, Control UI), skills.load.extraDirs (bundled skills), commands, and sometimes meta. The snippets in the Major provider examples section only show the pieces you need for models: the models tree and agents.defaults.model.primary.
What to do: keep your existing top-level keys (gateway, skills, commands, etc.) and add or update these two sections:
models.providers— add your provider (e.g.openrouter) and itsapiKey,baseUrlwhere required, andmodelslist.agents.defaults.model.primary— set the default model string (e.g.openrouter/auto) so the agent uses that provider.
If models or agents already exist, merge new keys into those objects instead of duplicating them.
Below is an example of one full Raw file shape as JSON (the editor may also accept JSON5-style quotes in practice). Your real file may include more fields (e.g. richer model metadata, meta). The provider blocks in the examples further down are the parts you align with models and agents here.
{
  "models": {
    "providers": {
      "openrouter": {
        "baseUrl": "https://openrouter.ai/api/v1",
        "apiKey": "YOUR_OPENROUTER_KEY",
        "models": [
          {
            "id": "auto",
            "name": "Auto (OpenRouter)",
            "reasoning": false,
            "input": ["text"],
            "cost": {
              "input": 0,
              "output": 0,
              "cacheRead": 0,
              "cacheWrite": 0
            },
            "contextWindow": 200000,
            "maxTokens": 8192
          }
        ]
      }
    }
  },
  "agents": {
    "defaults": {
      "model": {
        "primary": "openrouter/auto"
      }
    }
  },
  "commands": {
    "native": "auto",
    "nativeSkills": "auto",
    "restart": true,
    "ownerDisplay": "raw"
  },
  "gateway": {
    "bind": "lan",
    "controlUi": {
      "dangerouslyAllowHostHeaderOriginFallback": true,
      "dangerouslyDisableDeviceAuth": true
    },
    "auth": {
      "mode": "token",
      "token": "YOUR_GATEWAY_TOKEN"
    }
  },
  "skills": {
    "load": {
      "extraDirs": ["/app/skills"]
    }
  }
}Gateway token vs provider API key:
gateway.auth.tokenis only for logging into the OpenClaw Control UI / gateway.models.providers.*.apiKeyis your LLM vendor key (OpenRouter, OpenAI, etc.) — they are different.
Major provider examples
Use one provider block at a time first, confirm it works, then add more providers. Each example below is a merge fragment: ... is omitted config (lines above or below), and the }, before "models" is the close of whatever key sits above models in your file (for example skills or commands). The snippets are not valid JSON by themselves — merge the models and agents sections into your root object.
OpenRouter
...
  },
  "models": {
    "providers": {
      "openrouter": {
        "baseUrl": "https://openrouter.ai/api/v1",
        "apiKey": "sk-or-...",
        "models": [
          {
            "id": "auto",
            "name": "Auto (OpenRouter)"
          }
        ]
      }
    }
  },
  "agents": {
    "defaults": {
      "model": {
        "primary": "openrouter/auto"
      }
    }
  },
...OpenAI
...
  },
  "models": {
    "providers": {
      "openai": {
        "baseUrl": "https://api.openai.com/v1",
        "apiKey": "sk-...",
        "models": [
          {
            "id": "gpt-5.4",
            "name": "GPT-5.4"
          }
        ]
      }
    }
  },
  "agents": {
    "defaults": {
      "model": {
        "primary": "openai/gpt-5.4"
      }
    }
  },
...Anthropic
...
  },
  "models": {
    "providers": {
      "anthropic": {
        "baseUrl": "https://api.anthropic.com/v1",
        "apiKey": "sk-ant-...",
        "models": [
          {
            "id": "claude-opus-4-6",
            "name": "Claude Opus 4.6"
          }
        ]
      }
    }
  },
  "agents": {
    "defaults": {
      "model": {
        "primary": "anthropic/claude-opus-4-6"
      }
    }
  },
...Google (Gemini)
...
  },
  "models": {
    "providers": {
      "google": {
        "apiKey": "AIza...",
        "models": [
          {
            "id": "gemini-3.1-pro-preview",
            "name": "Gemini 3.1 Pro Preview"
          }
        ]
      }
    }
  },
  "agents": {
    "defaults": {
      "model": {
        "primary": "google/gemini-3.1-pro-preview"
      }
    }
  },
...xAI (Grok)
...
  },
  "models": {
    "providers": {
      "xai": {
        "apiKey": "xai-...",
        "models": [
          {
            "id": "grok-4",
            "name": "Grok 4"
          }
        ]
      }
    }
  },
  "agents": {
    "defaults": {
      "model": {
        "primary": "xai/grok-4"
      }
    }
  },
...Mistral
...
  },
  "models": {
    "providers": {
      "mistral": {
        "baseUrl": "https://api.mistral.ai/v1",
        "apiKey": "sk-...",
        "models": [
          {
            "id": "mistral-large-latest",
            "name": "Mistral Large Latest"
          }
        ]
      }
    }
  },
  "agents": {
    "defaults": {
      "model": {
        "primary": "mistral/mistral-large-latest"
      }
    }
  },
...Together AI
...
  },
  "models": {
    "providers": {
      "together": {
        "baseUrl": "https://api.together.xyz/v1",
        "apiKey": "together-...",
        "models": [
          {
            "id": "moonshotai/Kimi-K2.5",
            "name": "Kimi K2.5"
          }
        ]
      }
    }
  },
  "agents": {
    "defaults": {
      "model": {
        "primary": "together/moonshotai/Kimi-K2.5"
      }
    }
  },
...Bedrock note (no API key)
Amazon Bedrock uses AWS credentials (for example AWS_ACCESS_KEY_ID, AWS_SECRET_ACCESS_KEY, AWS_REGION) rather than an API key. A minimal provider entry looks like:
...
  },
  "models": {
    "providers": {
      "amazon-bedrock": {
        "baseUrl": "https://bedrock-runtime.us-east-1.amazonaws.com",
        "api": "bedrock-converse-stream",
        "auth": "aws-sdk",
        "models": [
          {
            "id": "us.anthropic.claude-opus-4-6-v1:0",
            "name": "Claude Opus 4.6 (Bedrock)"
          }
        ]
      }
    }
  },
  "agents": {
    "defaults": {
      "model": {
        "primary": "amazon-bedrock/us.anthropic.claude-opus-4-6-v1:0"
      }
    }
  },
...Notes
- Gateway auth token and model provider API keys are different settings.
- If you get a provider error (for example missing Anthropic key), update your default model to a provider you have configured.
- If a provider fails validation, first ensure required provider fields are present (
baseUrl,models, andapiKeywhere applicable).